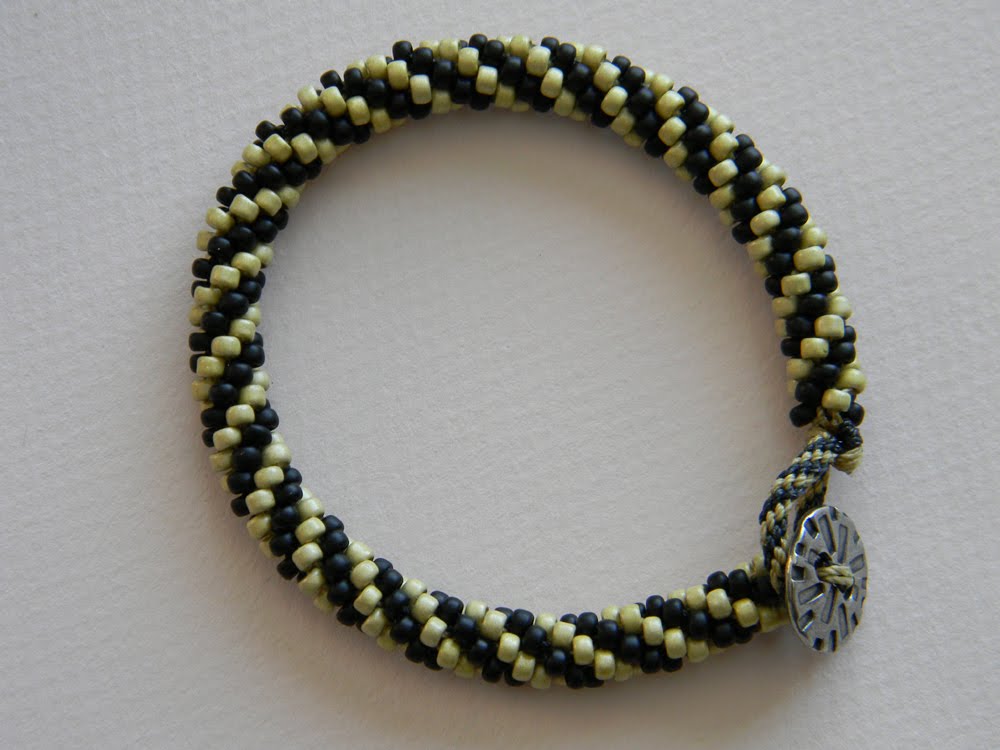
Bracelet No. 87
-
Daily Bracelets and Bead Kits designed by AnitaNH.
See them at Anita's Beads of Wakefield, New Hampshire
Thursday, April 19, 2012
Bead Club Tonight!
Join us tonight from 7-9 P.M. for the Bead Club meeting at Anita's Beads. Call Anita at 6030522-6529 if you have questions. The design on the poster is one of our cool new Op Art buttons!
Wednesday, April 11, 2012
Wednesday, April 4, 2012
About Stones: Spiny Oyster

Astrological Sign: Aquarius
Chakra: Sacral, Crown
Lore: Called the stone of the sea, spiny oyster provides patience and understanding, bringing comfort and peace of mind to the wearer. The Incas employed purple spiny oyster (the color of good judgement) for seeking spiritual fulfillment. Orange spiny oyster (the color of vitality and endurance) stimulates creativity and encourages willingness to embrace new ideas.
Biology: Spiny oyster, Spondylus princeps, is named for the spines on its back and comes in shades of orange, red, white and purple. Spiny oyster shell has been used in Native American jewelry for centuries.
Locality: Off the coast of Baja California, Mexico and Ecquador
About Stones: Cobalto Calcite

Astrological Sign: Leo
Chakra: Brow, Crown, Heart
Lore: Also known as sphaerocobaltite, it is used to enhance the peak of creative endeavors, supporting the realization that all things are possible. A gift of love, it helps in the formation of friendships.
Geology: Cobalto calcite is a carbonate which occurs in a deep “hot pink” color as crusts and small crystals in cobalt ore locations. It is often found associated with malachite and dolomite.
Localities: Zaire, Germany
About Stones: Sugilite

Astrological Sign: Virgo
Chakra: Brow, Crown
Lore: Sugilite represents the Age of Aquarius and enables us to willingly accept being here and living now. It embodies the perfection of spiritual love and its manifestation on earth. It eliminates negative attributes and gives a feeling of freedom.
Geology: Sugilite was discovered in Japan in 1944 and is named after its discoverer, Dr. Kenichi Sugi. Sugilite is formed primarily in pegmatites of alkaline magmas. It is very rare and only one other source has been found.
Localities: Japan, South Africa
About Stones: Boulder Opal

Astrological Sign: Scorpio
Chakra: All
Lore: Boulder opal is called the “Queen of Gems” and is associated with ‘good luck’ for all sun signs. It combines all 7 colors of the cosmos in one, making it a stone for both artists and musicians: seven colors, seven notes. As jewelry it has a harmonizing effect on all chakras, and may change color when used by high-energy/intensive people. It induces inspiration for visualizing creative efforts.
Geology: Boulder opal is Silicon Dioxide (SiO2.n H20) on ironstone matrix. Formed over 70 million years ago during the Tertiary Period and discovered in Australia in 1869.
Locality: Queensland, Australia
About Stones: Howlite

Astrological Sign: Gemini
Chakra: Sacral
Lore: Howlite dispels criticism, and lessens rudeness and boisterousness. It helps us combine the power of reasoning with discernment and patience.
Geology: Howlite is hydrated calcium silico-borate found in arid regions and borate deposits. It forms dense white compact masses that resemble unglazed porcelain. In California it occurs in nodules sometimes several hundred pounds in weight. It is frequently dyed blue to imitate turquoise.
Localities: California, Nova Scotia
Saturday, March 31, 2012
More Kumihimo Jewelry by Harry
Here are some new Kumihimo necklaces by Harry, whose work was featured in a previous post. His first design is a necklace for "Baby Girl" created with Size 8/0 Miyuki seed beads in Silver-Lined Cobalt AB. A sweet little Spiral Butterfly charm makes a cute pendant.
Here's a coordinating set using Miyuki Garnet Lined Ruby AB (No. 367) and Berry Lined Light Topaz AB (N0. 342) with some Czech glass 5x6mm Siam Ruby Vega Rosebuds.
Thursday, March 29, 2012
Bead Club with Special Guest

Where did the week go? Tonight, Thursday March 29th, is Bead Club from 7-9 p.m. at Anita's Beads. My friend Harry will be on hand to show off some of his latest Kumihimo braided necklace designs. Check out his earlier designs here.
I will be demonstrating basic braiding, braiding with beads, and end finishing so join us and learn how do create your own 8-strand round Japanese kumihimo braided jewelry.
I couldn't resist illustrating this post with a medley of my latest fabric patterns. Read more on my collage blog.
Thursday, March 22, 2012
Bead Club Meeting Tonight

The Bead Club will meet tonight, Thursday March 22 at Anita's Beads from 7-9 pm. All are welcome to attend. Bring a project to share with the group. This can be something for troubleshooting if you are stuck or need motivation! Call Anita at 603-522-6529 if you have questions. See the Facebook Info page for directions to the shop. Hope to see you.
Sunday, March 18, 2012
Kumihimo Jewelry by Harry


I had a special treat to share with last Thursday's Bead Club: some fabulous kumihimo braided necklaces made by Harry. Today he gave me permission to post photos of his work, and he is planning to attend the Bead Club meeting on Thursday March 29th from 7-9 pm so save the date!
Here's a close-up of the two-color necklace which is made of size 6/0 Czech seed beads on S-Lon cord.
Thursday, March 15, 2012
Bead Club Tonight

The Bead Club will be meeting tonight, Thursday March 15th, from 7-9 pm at Anita's Beads. Bring a project for sharing or troubleshooting. I will be introducing some of our new antique copper and antique brass findings and chain. All are welcome to attend. Contact the shop at 603-522-6529 if you have questions. Hope to see you!
Saturday, March 10, 2012
8-Cord Kumihimo Spiral Bracelet Instructions - Part 1.

I love the simplicity of the design of my latest kumihimo braided bracelet using size 8 Japanese seed beads. The spiral pattern is pleasing to the eye and the materials cost is low! To make the spiral pattern, choose two contrasting colors of size 8 seed beads. You can use either Japanese or Czech seed beads. My design utilizes matte black Miyuki (stock no. MI-8-401F) and lovely matte gold Toho's (stock no. TH-8-559F). The beads are strung on coordinating colors of S-Lon cord. I used black and Light Khaki. If you look at the close-up photo below, you will see that the cord shows ever-so-slightly, so matching the cord color to the bead is a good idea if you can manage it.
Each strand of cord will be strung with 50 beads, four strands of black, and four strands of gold, so it will take 200 beads of each of the two colors to make a bracelet length. This is approximate. You can string on more beads further into the project if you need to, or stop braiding before all beads are used.
You will need a Mini Kumihimo braiding disc, eight bobbins, and a button to make the closure. Sharp scissors, and "Bead Tip" hypo cement to glue your end knot will also be required. A short "Big-Eye" needle is nice to use to thread your beads onto the cord, but it is not a necessity. All of these supplies are stocked at Anita's Beads.
I start by cutting two 2-yard pieces of black S-Lon cord, and two 2-yard pieces of light khaki. Strands will be folded in half to give you a total of eight cords required for this type of Kumihimo braid. I will begin with adding my button by taking all four cords together and threading them through one hole of my button from the back (the button is slightly domed in shape, the high part of the dome is the top, and the back of the button is slightly "dished") and then through the second hole towards the back. I keep sliding the button until it rests at the center point of the four cords, at the fold.
Then I place the button top-side down into the center of my Mini Kumihimo disc. Supporting the button with my fingers, I slide each of the eight cords into slots before and after the four dots located at the North-East-South-West positions on the disc. To make the spiral design, I want to arrange the cords so one color runs vertical (North and South) and the other color runs horizontal (East and West).
Once the cords are secured into the slots with my button face down in the center, I flip the disc over and begin stringing on beads. Each of the four black cords get 50 black beads, and each of the four light khaki cords get 50 gold beads. After adding each group of 50, I slide them up close to the disc and wind the remaining cord onto a bobbin so the beads rest above the bobbin. The bobbins serve two purposes: they keep the beads from sliding off of the cord, and they keep the cords from becoming tangled as you work. You can always unwind the cord, remove the bobbin, and string on more beads if necessary.
When all your beads and bobbins are in place you are ready to start braiding. I hold the disc in my left hand and manipulate the cords with my right, turning the disc in a counter-clockwise direction as I work. I can use the fingers of my left had to create a little tension on the braid by grasping the button from the back. Some people prefer to use a weight.
I start out by braiding a short section without moving up beads. This will create an area of plain cord just behind the button where your loop will attach to secure the bracelet. I start by moving the cord in the Left South position UP to the first empty slot to the Left North, and then take the cord in the Right North position and move it DOWN to the first empty slot to the Right South. Then I turn the disc one-quarter of a turn counter-clockwise and repeat. You can tug on the bobbins to release more cord as needed as you go.
So the sequence is bottom Left UP, top Right DOWN, 1/4 counter-clockwise turn. At first it doesn't seem like you're doing much, but then the braid becomes established and you will see the spiral pattern beginning to form. Keep braiding without beads until you create a space of about 1/4 (.25) inch.
You will notice that as you braid, the position of the cords will move away from the dots. Gradually they will work around until, again, all eight cords will come into position at four compass points with one cord on either side of each dot. This is your check point. If the cords fail to line up, check your work for errors and work in reverse until you eliminate the error.
[Continue to Part 2.]
Subscribe to:
Posts (Atom)