Showing posts with label Japanese Seed Beads. Show all posts

Thursday, April 9, 2015

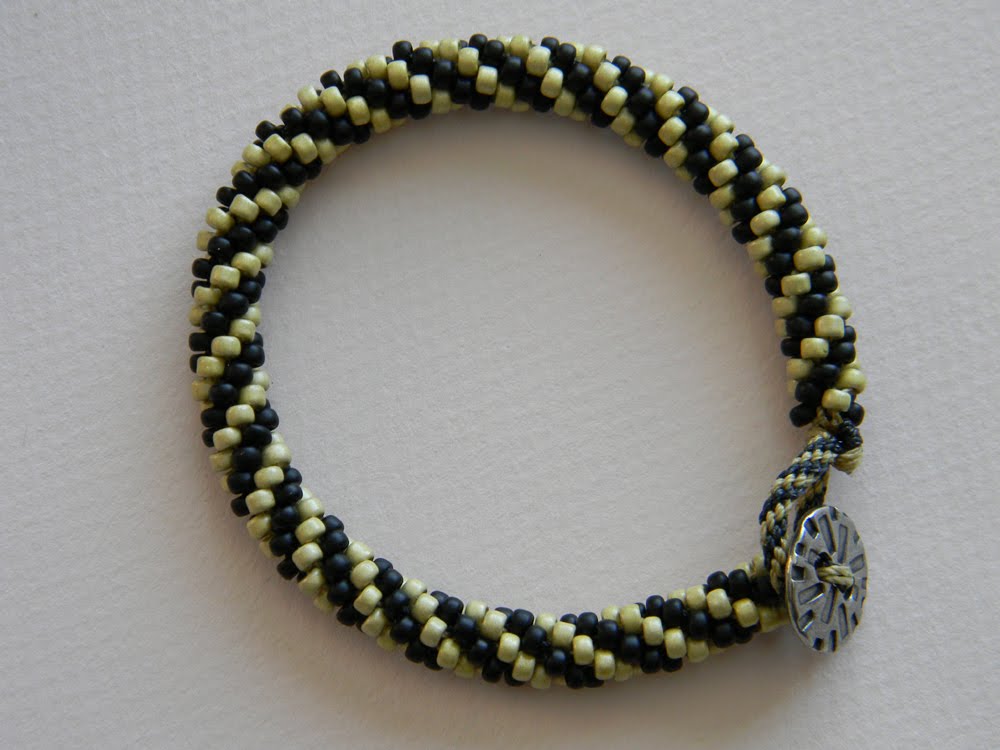
8-Cord Kumihimo Spiral Bracelet Instructions - Part 2.

Using the same sequence of moves, bottom Left UP, top Right DOWN, 1/4 counter-clockwise turn, continue braiding. Only now you will begin to braid in beads. Slide one bead down to the center as you move a cord up, and do the same when you move a cord down. Each cord you move will be under the adjacent cord. Position the bead so that it slides under the adjacent cord to lock it in place. The first four placements seem awkward, but once a few beads are in place, each bead that you braid will move into position like a puzzle.

Maintain tension in order to form an even braid. I am always tightening the cords as I braid, and I keep my braid in the center of the wheel. If the bead does not want to slip into place, try putting a little tension by pulling down on the braid from below. The goal is to have no thread showing between the beads in the finished braid.

Some people like to hang a weight from the finished end of the braid. In general I do not like to use a weight because it can result in your thread showing if too much weight is applied. I apply a bit of tension on the button in the beginning, but as the braid lengthens, the weight of the braid itself is usually sufficient.

Continue braiding until your bracelet is the length you require. You need not braid all of the beads that you have strung on. Also, you can remove the bobbins and string on additional beads if you did not string on enough initially.

After you braid in your last bead, continue braiding with just cord to form the loop for the button. Remember that cord braided without beads will stretch. So when you are 3/4 of the way to having a length of braid that, when formed into a loop will fit around the button, stretch it!

When your last braiding segment is long enough it is time to remove the braid from the wheel. First, take the two opposite cords that you would have exchanged next, remove the bobbins, and then remove them from the slots. Tie them in a square knot to secure the work from un-braiding. Now remove the remaining six bobbins and remove the cords from their slots.

The last step is to finish the loop and your bracelet will be ready to wear. To finish the loop you will need a stiff darning needle with an eye large enough for one strand of cord. A pair of chain nose pliers is useful to pull the needle. The center of the braid is hollow but the space gets tighter as each cord is drawn through. I also like to secure the base of the loop with a thin application of Hypo Cement.

Thread one cord onto the darning needle. Fold the loop over and pierce the needle through the base of the braid right above where the beads begin and pull the cord through tightly. Make a half-hitch knot to secure it and insert the needle down into the beaded part of the braid from the top, through the hollow center about and inch or so and then out through the side of the braid. (It is necessary to take care that the needle exits between beads. If the point of the needle goes through a bead hole, chances are that bead will be broken as the eye is forced through.) Draw the needle and cord out the side of the braid and tighten it but do not trim the cord.

Now thread a second cord onto the darning needle. Insert the needle down into the beaded part of the braid and through the hollow center about an inch and then out through the side like the first cord. Repeat with cords three through seven. Cord eight will be wrapped a few times around the base of the loop and inserted through the center of the braid as before. Your last few cords may fit tightly and require pliers to pull them through.

I find it difficult to maintain a neat wrap while inserting the last cord so I insert the cord first, then wrap the loop remaining above the braid around the base of the loop, and then draw the cord through the rest of the way to tighten the wrap. Using the thin applicator tip, coat the wrapped portion of the loop with Hypo Cement and allow it to dry.

The final step is to trim the cords one at a time by putting a little tension on the cord as you carefully cut it close to the braid. The tension causes the ends to slip back into the braid where they remain hidden. Your bracelet is complete!


Tip #1: Although you can stop and add beads, you cannot add more cord. For this reason I cut my cord generously. This allows me to snip off and discard frayed bits from the end of the cord. You will need about a foot of cord per strand at the end of the braiding process in order to comfortably finish the loop. And it is good practice to avoid braiding in the end of the cord that has been weakened by the needle in the bead-stringing process.

Tip #2: Inspect your work frequently so you catch mistakes early. A hole in the braid will result if you forget to move a bead. Loss of tension will cause a bead to slip into the center of the braid and again a hole will result. You can correct these errors by braiding in reverse.

[Return to Part 1.]


Saturday, March 31, 2012

More Kumihimo Jewelry by Harry

Here are some new Kumihimo necklaces by Harry, whose work was featured in a previous post. His first design is a necklace for "Baby Girl" created with Size 8/0 Miyuki seed beads in Silver-Lined Cobalt AB. A sweet little Spiral Butterfly charm makes a cute pendant.


Here's a coordinating set using Miyuki Garnet Lined Ruby AB (No. 367) and Berry Lined Light Topaz AB (N0. 342) with some Czech glass 5x6mm Siam Ruby Vega Rosebuds.


Sunday, March 18, 2012

Kumihimo Jewelry by Harry


I had a special treat to share with last Thursday's Bead Club: some fabulous kumihimo braided necklaces made by Harry. Today he gave me permission to post photos of his work, and he is planning to attend the Bead Club meeting on Thursday March 29th from 7-9 pm so save the date!

Here's a close-up of the two-color necklace which is made of size 6/0 Czech seed beads on S-Lon cord.


I particularly like his designs with size 8/0 Japanese seed beads combined with Czech glass rosebuds. The glossy finish on the rosebuds provides a nice contrast with the matte finish of the seed beads. I can't wait to see the new designs he'll have to show us in two weeks.


Saturday, March 10, 2012

8-Cord Kumihimo Spiral Bracelet Instructions - Part 1.


I love the simplicity of the design of my latest kumihimo braided bracelet using size 8 Japanese seed beads. The spiral pattern is pleasing to the eye and the materials cost is low! To make the spiral pattern, choose two contrasting colors of size 8 seed beads. You can use either Japanese or Czech seed beads. My design utilizes matte black Miyuki (stock no. MI-8-401F) and lovely matte gold Toho's (stock no. TH-8-559F). The beads are strung on coordinating colors of S-Lon cord. I used black and Light Khaki. If you look at the close-up photo below, you will see that the cord shows ever-so-slightly, so matching the cord color to the bead is a good idea if you can manage it.


Each strand of cord will be strung with 50 beads, four strands of black, and four strands of gold, so it will take 200 beads of each of the two colors to make a bracelet length. This is approximate. You can string on more beads further into the project if you need to, or stop braiding before all beads are used.

You will need a Mini Kumihimo braiding disc, eight bobbins, and a button to make the closure. Sharp scissors, and "Bead Tip" hypo cement to glue your end knot will also be required. A short "Big-Eye" needle is nice to use to thread your beads onto the cord, but it is not a necessity. All of these supplies are stocked at Anita's Beads.


I start by cutting two 2-yard pieces of black S-Lon cord, and two 2-yard pieces of light khaki. Strands will be folded in half to give you a total of eight cords required for this type of Kumihimo braid. I will begin with adding my button by taking all four cords together and threading them through one hole of my button from the back (the button is slightly domed in shape, the high part of the dome is the top, and the back of the button is slightly "dished") and then through the second hole towards the back. I keep sliding the button until it rests at the center point of the four cords, at the fold.

Then I place the button top-side down into the center of my Mini Kumihimo disc. Supporting the button with my fingers, I slide each of the eight cords into slots before and after the four dots located at the North-East-South-West positions on the disc. To make the spiral design, I want to arrange the cords so one color runs vertical (North and South) and the other color runs horizontal (East and West).


Once the cords are secured into the slots with my button face down in the center, I flip the disc over and begin stringing on beads. Each of the four black cords get 50 black beads, and each of the four light khaki cords get 50 gold beads. After adding each group of 50, I slide them up close to the disc and wind the remaining cord onto a bobbin so the beads rest above the bobbin. The bobbins serve two purposes: they keep the beads from sliding off of the cord, and they keep the cords from becoming tangled as you work. You can always unwind the cord, remove the bobbin, and string on more beads if necessary.

When all your beads and bobbins are in place you are ready to start braiding. I hold the disc in my left hand and manipulate the cords with my right, turning the disc in a counter-clockwise direction as I work. I can use the fingers of my left had to create a little tension on the braid by grasping the button from the back. Some people prefer to use a weight.

I start out by braiding a short section without moving up beads. This will create an area of plain cord just behind the button where your loop will attach to secure the bracelet. I start by moving the cord in the Left South position UP to the first empty slot to the Left North, and then take the cord in the Right North position and move it DOWN to the first empty slot to the Right South. Then I turn the disc one-quarter of a turn counter-clockwise and repeat. You can tug on the bobbins to release more cord as needed as you go.

So the sequence is bottom Left UP, top Right DOWN, 1/4 counter-clockwise turn. At first it doesn't seem like you're doing much, but then the braid becomes established and you will see the spiral pattern beginning to form. Keep braiding without beads until you create a space of about 1/4 (.25) inch.


You will notice that as you braid, the position of the cords will move away from the dots. Gradually they will work around until, again, all eight cords will come into position at four compass points with one cord on either side of each dot. This is your check point. If the cords fail to line up, check your work for errors and work in reverse until you eliminate the error.

[Continue to Part 2.]

Friday, March 9, 2012

Size 11/0 Seed Beads - New in March


Here's a selection of new Japanese seed bead colors available in size 11/0 at Anita's Beads.

Tuesday, February 14, 2012

Size 8/0 Japanese Seed Beads - New in February


Here are twenty-four new colors (not counting a few repeats) of size 8/0 Japanese seed beads manufactured by Miyuki which you can find on the wall at Anita's Beads. Email Anita for prices or to place an order. These will look fabulous braided Kumihimo-style on S-Lon cord. Stay tuned for examples of this popular new trend.

Size 6/0 Japanese Seed Beads - New in February


Here are eight new colors of size 6/0 Japanese seed beads manufactured by Miyuki which you can find on the wall at Anita's Beads. Email Anita for prices or to place an order. These will look fabulous braided Kumihimo-style on Tex-400 cord. Stay tuned for examples of this popular new trend.

Friday, February 10, 2012

Kumihimo with 6/0 Seed Beads


Here are a few 8-cord round Kumihimo braids done with size 6 Japanese seed beads on Tex-400 cord. Only two of the cords were strung with beads which allows the center of the braid to show. They are quicker to make than braids with all eight cords carrying beads, and also a bit more flexible.

I started with four 2-yard pieces of Tex-400 folded in half and knotted at the fold, and left about 3/4 plain braiding before adding in beads. To finish ends I will bind cord with thread before cutting off the knots. The last step: 4mm barrel cone caps will be glued on the ends to cover the bare braid.

I love the look so much that I have ordered new colors in size 6 (in addition to some size 8 which are perfect for braiding on S-Lon cord). The new colors should be up on the wall by Thursday! The square Kumihimo plate used for flat braiding is expected to arrive in the same order.

Thursday, June 11, 2009

Japanese Seed Beads

My love affair with seed beads began over a dozen years ago with the discovery of Miyuki brand Japanese seed beads. I can still remember receiving my first half-kilo cellophane bags of loose 11/0 and 6/0 beads. Their beautiful colors and finishes were as alluring to me as faceted jewels.

Today Anita's Beads offers Miyuki beads in size 15/0, 11/0, 11/Delica, 8/0, 8/Delica, 6/0, 4mm Cubes and Size 3 Bugles, with a few Hex-cut beads thrown in for variety! Miyuki has earned the reputation for high quality, uniform size and incredible color selection.

Japanese seed beads manufactured by Toho are available in some unusual colors which have caught my attention more recently. Selected size 11 Delica-style beads called "Treasures" have been now been added to Anita's seed bead wall, in addition to some favorite hues in the 11/0, 8/0, and 6/0 sizes.

In my next post I will talk about what all those numbers mean in terms of actual size, and show you the seed bead wall at Anita's Beads, along with details on the recent Toho additions.