Showing posts with label Braiding. Show all posts

Thursday, April 9, 2015

8-Cord Kumihimo Spiral Bracelet Instructions - Part 2.

Using the same sequence of moves, bottom Left UP, top Right DOWN, 1/4 counter-clockwise turn, continue braiding. Only now you will begin to braid in beads. Slide one bead down to the center as you move a cord up, and do the same when you move a cord down. Each cord you move will be under the adjacent cord. Position the bead so that it slides under the adjacent cord to lock it in place. The first four placements seem awkward, but once a few beads are in place, each bead that you braid will move into position like a puzzle.

Maintain tension in order to form an even braid. I am always tightening the cords as I braid, and I keep my braid in the center of the wheel. If the bead does not want to slip into place, try putting a little tension by pulling down on the braid from below. The goal is to have no thread showing between the beads in the finished braid.

Some people like to hang a weight from the finished end of the braid. In general I do not like to use a weight because it can result in your thread showing if too much weight is applied. I apply a bit of tension on the button in the beginning, but as the braid lengthens, the weight of the braid itself is usually sufficient.

Continue braiding until your bracelet is the length you require. You need not braid all of the beads that you have strung on. Also, you can remove the bobbins and string on additional beads if you did not string on enough initially.

After you braid in your last bead, continue braiding with just cord to form the loop for the button. Remember that cord braided without beads will stretch. So when you are 3/4 of the way to having a length of braid that, when formed into a loop will fit around the button, stretch it!

When your last braiding segment is long enough it is time to remove the braid from the wheel. First, take the two opposite cords that you would have exchanged next, remove the bobbins, and then remove them from the slots. Tie them in a square knot to secure the work from un-braiding. Now remove the remaining six bobbins and remove the cords from their slots.

The last step is to finish the loop and your bracelet will be ready to wear. To finish the loop you will need a stiff darning needle with an eye large enough for one strand of cord. A pair of chain nose pliers is useful to pull the needle. The center of the braid is hollow but the space gets tighter as each cord is drawn through. I also like to secure the base of the loop with a thin application of Hypo Cement.

Thread one cord onto the darning needle. Fold the loop over and pierce the needle through the base of the braid right above where the beads begin and pull the cord through tightly. Make a half-hitch knot to secure it and insert the needle down into the beaded part of the braid from the top, through the hollow center about and inch or so and then out through the side of the braid. (It is necessary to take care that the needle exits between beads. If the point of the needle goes through a bead hole, chances are that bead will be broken as the eye is forced through.) Draw the needle and cord out the side of the braid and tighten it but do not trim the cord.

Now thread a second cord onto the darning needle. Insert the needle down into the beaded part of the braid and through the hollow center about an inch and then out through the side like the first cord. Repeat with cords three through seven. Cord eight will be wrapped a few times around the base of the loop and inserted through the center of the braid as before. Your last few cords may fit tightly and require pliers to pull them through.

I find it difficult to maintain a neat wrap while inserting the last cord so I insert the cord first, then wrap the loop remaining above the braid around the base of the loop, and then draw the cord through the rest of the way to tighten the wrap. Using the thin applicator tip, coat the wrapped portion of the loop with Hypo Cement and allow it to dry.

The final step is to trim the cords one at a time by putting a little tension on the cord as you carefully cut it close to the braid. The tension causes the ends to slip back into the braid where they remain hidden. Your bracelet is complete!


Tip #1: Although you can stop and add beads, you cannot add more cord. For this reason I cut my cord generously. This allows me to snip off and discard frayed bits from the end of the cord. You will need about a foot of cord per strand at the end of the braiding process in order to comfortably finish the loop. And it is good practice to avoid braiding in the end of the cord that has been weakened by the needle in the bead-stringing process.

Tip #2: Inspect your work frequently so you catch mistakes early. A hole in the braid will result if you forget to move a bead. Loss of tension will cause a bead to slip into the center of the braid and again a hole will result. You can correct these errors by braiding in reverse.

[Return to Part 1.]


Thursday, July 5, 2012

Buttons for Kumihimo


We have recently added some lovely new Czech glass buttons--so popular that we will be stocking additional colors soon. And the lovely "Tree of Life" button is now back in stock at Anita's Beads.

Bead Club Tonight


Bead Club will meet at Anita's Beads tonight Thursday July 5th from 7-9. All are welcome. Call Anita at 603-522-6529 with questions.

The bracelet in the photo is my latest kumihimo creation featuring a Czech dragonfly button with 4mm Czech faceted firepolish beads--now available as a limited edition kit!

Thursday, April 19, 2012

Chartreuse Kumihimo


Two Kumihimo braided bracelets in my favorite Chartreuse green. Above: Size 6/0 Czech seed beads on Tex-400 cord. Below: Size 8/0 Japanese seed beads on S-Lon cord (2 strands) braided with 1mm rayon-cotton cord (6 strands).


Saturday, March 31, 2012

More Kumihimo Jewelry by Harry

Here are some new Kumihimo necklaces by Harry, whose work was featured in a previous post. His first design is a necklace for "Baby Girl" created with Size 8/0 Miyuki seed beads in Silver-Lined Cobalt AB. A sweet little Spiral Butterfly charm makes a cute pendant.


Here's a coordinating set using Miyuki Garnet Lined Ruby AB (No. 367) and Berry Lined Light Topaz AB (N0. 342) with some Czech glass 5x6mm Siam Ruby Vega Rosebuds.


Thursday, March 29, 2012

Bead Club with Special Guest


Where did the week go? Tonight, Thursday March 29th, is Bead Club from 7-9 p.m. at Anita's Beads. My friend Harry will be on hand to show off some of his latest Kumihimo braided necklace designs. Check out his earlier designs here.

I will be demonstrating basic braiding, braiding with beads, and end finishing so join us and learn how do create your own 8-strand round Japanese kumihimo braided jewelry.

I couldn't resist illustrating this post with a medley of my latest fabric patterns. Read more on my collage blog.

Sunday, March 18, 2012

Kumihimo Jewelry by Harry


I had a special treat to share with last Thursday's Bead Club: some fabulous kumihimo braided necklaces made by Harry. Today he gave me permission to post photos of his work, and he is planning to attend the Bead Club meeting on Thursday March 29th from 7-9 pm so save the date!

Here's a close-up of the two-color necklace which is made of size 6/0 Czech seed beads on S-Lon cord.


I particularly like his designs with size 8/0 Japanese seed beads combined with Czech glass rosebuds. The glossy finish on the rosebuds provides a nice contrast with the matte finish of the seed beads. I can't wait to see the new designs he'll have to show us in two weeks.


Saturday, March 10, 2012

8-Cord Kumihimo Spiral Bracelet Instructions - Part 1.


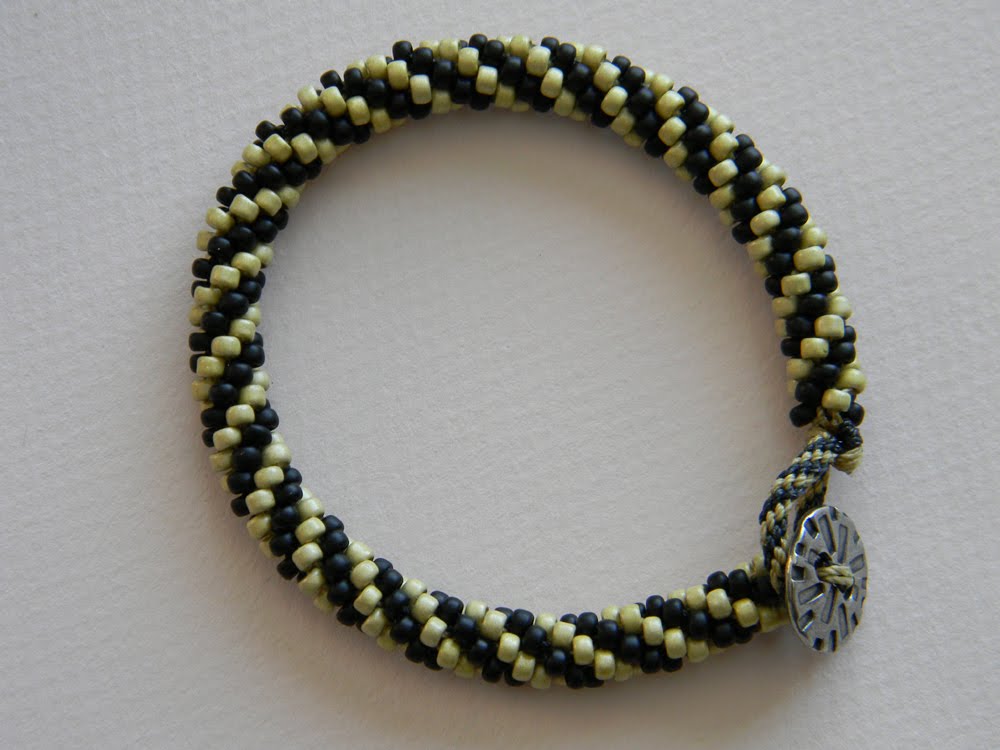
I love the simplicity of the design of my latest kumihimo braided bracelet using size 8 Japanese seed beads. The spiral pattern is pleasing to the eye and the materials cost is low! To make the spiral pattern, choose two contrasting colors of size 8 seed beads. You can use either Japanese or Czech seed beads. My design utilizes matte black Miyuki (stock no. MI-8-401F) and lovely matte gold Toho's (stock no. TH-8-559F). The beads are strung on coordinating colors of S-Lon cord. I used black and Light Khaki. If you look at the close-up photo below, you will see that the cord shows ever-so-slightly, so matching the cord color to the bead is a good idea if you can manage it.


Each strand of cord will be strung with 50 beads, four strands of black, and four strands of gold, so it will take 200 beads of each of the two colors to make a bracelet length. This is approximate. You can string on more beads further into the project if you need to, or stop braiding before all beads are used.

You will need a Mini Kumihimo braiding disc, eight bobbins, and a button to make the closure. Sharp scissors, and "Bead Tip" hypo cement to glue your end knot will also be required. A short "Big-Eye" needle is nice to use to thread your beads onto the cord, but it is not a necessity. All of these supplies are stocked at Anita's Beads.


I start by cutting two 2-yard pieces of black S-Lon cord, and two 2-yard pieces of light khaki. Strands will be folded in half to give you a total of eight cords required for this type of Kumihimo braid. I will begin with adding my button by taking all four cords together and threading them through one hole of my button from the back (the button is slightly domed in shape, the high part of the dome is the top, and the back of the button is slightly "dished") and then through the second hole towards the back. I keep sliding the button until it rests at the center point of the four cords, at the fold.

Then I place the button top-side down into the center of my Mini Kumihimo disc. Supporting the button with my fingers, I slide each of the eight cords into slots before and after the four dots located at the North-East-South-West positions on the disc. To make the spiral design, I want to arrange the cords so one color runs vertical (North and South) and the other color runs horizontal (East and West).


Once the cords are secured into the slots with my button face down in the center, I flip the disc over and begin stringing on beads. Each of the four black cords get 50 black beads, and each of the four light khaki cords get 50 gold beads. After adding each group of 50, I slide them up close to the disc and wind the remaining cord onto a bobbin so the beads rest above the bobbin. The bobbins serve two purposes: they keep the beads from sliding off of the cord, and they keep the cords from becoming tangled as you work. You can always unwind the cord, remove the bobbin, and string on more beads if necessary.

When all your beads and bobbins are in place you are ready to start braiding. I hold the disc in my left hand and manipulate the cords with my right, turning the disc in a counter-clockwise direction as I work. I can use the fingers of my left had to create a little tension on the braid by grasping the button from the back. Some people prefer to use a weight.

I start out by braiding a short section without moving up beads. This will create an area of plain cord just behind the button where your loop will attach to secure the bracelet. I start by moving the cord in the Left South position UP to the first empty slot to the Left North, and then take the cord in the Right North position and move it DOWN to the first empty slot to the Right South. Then I turn the disc one-quarter of a turn counter-clockwise and repeat. You can tug on the bobbins to release more cord as needed as you go.

So the sequence is bottom Left UP, top Right DOWN, 1/4 counter-clockwise turn. At first it doesn't seem like you're doing much, but then the braid becomes established and you will see the spiral pattern beginning to form. Keep braiding without beads until you create a space of about 1/4 (.25) inch.


You will notice that as you braid, the position of the cords will move away from the dots. Gradually they will work around until, again, all eight cords will come into position at four compass points with one cord on either side of each dot. This is your check point. If the cords fail to line up, check your work for errors and work in reverse until you eliminate the error.

[Continue to Part 2.]

Friday, February 10, 2012

Kumihimo with 6/0 Seed Beads


Here are a few 8-cord round Kumihimo braids done with size 6 Japanese seed beads on Tex-400 cord. Only two of the cords were strung with beads which allows the center of the braid to show. They are quicker to make than braids with all eight cords carrying beads, and also a bit more flexible.

I started with four 2-yard pieces of Tex-400 folded in half and knotted at the fold, and left about 3/4 plain braiding before adding in beads. To finish ends I will bind cord with thread before cutting off the knots. The last step: 4mm barrel cone caps will be glued on the ends to cover the bare braid.

I love the look so much that I have ordered new colors in size 6 (in addition to some size 8 which are perfect for braiding on S-Lon cord). The new colors should be up on the wall by Thursday! The square Kumihimo plate used for flat braiding is expected to arrive in the same order.

Monday, January 23, 2012

Plain Kumihimo


I can't get enough Kumihimo these days. More and more people are getting into it. I'm certainly doing my bit at Anita's Beads! I always have a project going so I can demonstrate at the counter. If you are a fan of this popular type of braiding from Japan and you need supplies, or if you have been thinking about giving it a try, make sure to visit.

I've noticed that my Kumihimo Bracelet Sampler photo, recently added to my Tumblr and pinned a few times by others on Pinterest, has been directing traffic to this blog. Today's photo (can you tell I have cats?) illustrates what can be achieved with one simple color of cord: 1mm cotton/rayon (blue), Japanese waxed cotton (mauve), and 2mm Supreme cotton (black).

Thursday, January 12, 2012

Kumihimo with Tex-400 Macrame Cord


Anita's Beads is now stocking Tex-400 macrame cord in 22 colors. It comes on spools like S-Lon, and it is about twice as thick. There are 35 yards to the spool as opposed to the 77 yards you get with S-Lon. It is available in fewer colors than S-Lon but the colors match the S-Lon line.


This is one of my favorite necklaces. (Some day I may even finish it!) It combines Czech glass beads (knotted with spaces in between like my Illusion Necklaces) on 8 strands of Tex-400 cord. I cut long strands so that after all the strands were knotted I could tie them together after the beads and braid both sides (one at a time) in my small kumihimo disc. I will end by gluing on 4mm barrel caps once I decide how long I want my finished necklace to be.

I made the second version (displayed at the top of the page) in green. This one combines 6 strands of Tex-400 cord with 2 strands of S-Lon. The 5mm round turquoise-green beads had holes too small for Tex-400. When I braided the ends, I mixed in some more of the 5mm beads on the S-Lon cord, leaving the Tex-400 strands plain.


The kumihimo braid on the far right of this last photo was done on Tex-400 with small Antique Copper beads on one strand only added every other turn.

Monday, January 9, 2012

Kumihimo with 3mm Faceted Firepolish


Kumihimo, or Japanese braiding, is my favorite new method for making beaded bracelets. I have recently begun a series made with 3mm faceted Czech firepolished beads strung on S-Lon cord. The photo above shows my first 3mm firepolish creation, the light aquamarine bracelet second from the bottom.

I use my small round kumihimo disc and make an 8-strand round braid. For a bracelet I cut four 2-yard pieces of S-Lon cord and then fold them in half to get eight strands. Each strand carries about 5 inches of beads (approx. 42). After I string on the beads by hand (the holes in these 3mm beads are not large enough to accommodate a needle) I wind the excess cord onto a bobbin to keep the beads from sliding off the cord. The beads themselves are not wound around the bobbin but sit just above it, below the kumihimo disc.


Because I plan to end my bracelet with antiqued silver tulip caps, I have attached a piece of 20 gauge silver-plated wire to the beginning of my braid by running all the cords through a small wire-wrapped loop. I make one rotation of braiding on my wheel with cord only to secure the wire. Then I slide up one bead each time I bring up a cord.

The loop of wire will be hidden in the cap. The tail of straight wire that comes through the top of the cap will be used to form another wire-wrapped loop securing my clasp. On the second side I will form just a loop, one large enough to clasp to.


Anita's Beads offers Czech faceted firepolished beads by the hank in a wide variety of colors. One hank is enough to make one and one-half bracelets. My plan is to make two different plain bracelets and use my extra beads to combine the colors in a spiral pattern on a third bracelet.


Here's the green one all finished with tulip end caps.

Friday, December 9, 2011

Advanced Kumihimo Sundays


Two Advanced Kumihimo Drop-In classes have been scheduled: Sunday December 11th and Sunday December 18th beginning at 9:30 am. Stop by Anita's Beads and learn how to do Japanese braiding with beads. A $25. fee includes instruction and all materials to make a kumihimo braided bracelet using S-Lon cord decorated with size 8/0 Japanese seed beads.

You will receive: 1 mini kumihimo braiding disc, 1 spool of S-Lon cord in the color of your choice (there are 50 different colors to choose from), one 22 gram tube of Miyuki size 8/0 seed beads, a set of 8 bobbins, findings (barrel endings, jump rings and a toggle clasp), and a tube of glue to attach the endings to your completed braid.

You should be familiar with the basic creation of the 8-strand round braid before learning how to create a braid decorated with seed beads. Beginners should attend our Beginning Kumihimo Drop-In class to start.

This invitation to learn beaded braiding is also extended to those who have recently purchased kumihimo materials at Anita's Beads. You are welcome to join us. Contact Anita at 603-522-6529 for more information.

Tuesday, December 6, 2011

Beginning Kumihimo Saturdays


Three Beginning Kumihimo Drop-In classes have been scheduled: Saturday December 10th, Saturday December 17th, and Saturday December 31st beginning at 9:30 am. Stop by Anita's Beads and learn how to do Japanese braiding. A $25. fee includes instruction and all materials to make a 24-inch round braid from 1mm Rayon/Cotton ("rat-tail") cord.

You will receive: 1 large round braiding disc, 12 yards of Rayon/Cotton cord in the color(s) of your choice (there are 30 different colors to choose from), a set of 8 bobbins, findings (barrel endings, jump rings and a toggle clasp), and a tube of glue to attach the endings to your completed braid.


Once you become familiar with the basic creation of the 8-strand round braid, learn how to create a braid decorated with seed beads. We will be covering this technique in our Advanced Kumihimo Drop-In classes.

This invitation to learn basic 8-cord braiding is also extended to those who have recently purchased kumihimo materials at Anita's Beads. You are welcome to join us. Contact Anita at 603-522-6529 for more information.

Monday, November 28, 2011

Back To Normal


The roofing project is finished and things are back to normal at Anita's Beads. We've been demonstrating Kumihimo or Japanese braiding to everyone who comes in. Once our next order of supplies arrives we will begin the Saturday morning drop-in classes again.

We will post more information as soon as Mr. UPS pays us a visit!

Friday, September 30, 2011

Kumihimo Class Saturday and Sunday


Bobbins and other kumihimo supplies are in! Drop in at Anita's Beads Saturday or Sunday morning at 9 a.m. and join us for a beginning kumihimo class. A materials fee of $25. will cover all of the tools and supplies that you will need to make a 20 to 24 inch necklace braid. Our sample above illustrates only one of many color combinations that you can choose from. In addition to your braid, you take with you a set of eight bobbins, Zap Jewelry Gel, and Kumihimo disc for future braiding projects.

Kumihimo is a popular form of Japanese braiding. We will be making a basic 8-strand braid to introduce this ancient craft. Hope you can join us. Contact Anita at 603-522-6529 for more information.

Friday, September 9, 2011

Kumihimo Braiding


I was introduced to Kumihimo, the art of Japanese braiding, over a year ago by a friend from South Africa. The idea took some time to incubate but a few weeks ago I decided to order the necessary supplies and finally try it for myself.

Now I am totally hooked! I started with 1mm cotton/rayon cord (usually referred to as "rat tail" cord) in two tones of green plus coffee and gold to make the basic round 8-cord braid. In the photos above you can see that my first braid is slightly irregular. For my next braid I used green only, dark green (6 cords) and chartreuse (2 cords), and then made one with coffee (6 cords) accented with gold (2 cords).

After that I needed more colors of course so I increased my selection to the twenty shown below. I made a 2-tone blue braid, followed by a teal version. I have a few more color combinations to explore before I branch out into cords of different thickness and texture. The addition of beads will allow endless modification as well!


As soon as I receive a back-ordered shipment of supplies, I will be offering Saturday morning Kumihimo classes. Stay tuned for the notification here, as well as future posts on Kumihimo books and findings.