Showing posts with label Czech Glass Beads. Show all posts

Monday, February 1, 2016

Bead & Mineral Sale


Sale at Anita's Beads: Now through February 14th take 20% off of our most popular Czech glass beads. Save on all 6mm round, 4mm round, 3mm round, 6mm firepolish bicone, and 4mm cube Czech beads. Mineral lovers get 50% off all tumbled stones and specimens in the back room.

Sunday, August 18, 2013

New Czech Faceted Rondelles


New Czech 3x5mm faceted rondelles in Lumi Amethyst, Lumi Blue, Lumi Green, Lumi Champagne and Lumi Brown will make cute Daily Bracelet dangles! And there are more in Turquoise, Crystal AB, Metallic Hematite, Metallic Bronze Light and Metallic Bronze Dark.


Wednesday, October 17, 2012

Directions for Tube Bracelet


Your kit contains:
1 24-inch piece of .015 beading wire
2 crimp beads
2 metal wire guards (look like horse shoes) 
1 magnet clasp
4 3x2mm rondelle metal beads
4 3mm round metal beads
4 2x38mm metal tubes
6 metal flat heishi spacer beads
10 colored bracelet beads
1 focal bead

You will need the following tools:
Chain nose pliers
Cutters

Step 1) Attach clasp to wire guard with crimp:
Thread the beading wire through one tube of the wire guard from the bottom, and then down the second tube from the top. (Note: if you are unfamiliar with wire guards, they are horse-shoe shaped with a hollow tube portion at both ends connected by an open u-shaped channel between them.)

Move the wire guard to the center of the beading wire. Now slip one ring of your magnet clasp over one end of the beading wire and bring it up into wire guard so it rests around the u-shaped channel. Once the magnet clasp is attached, bring both ends of the beading wire through the crimp. Pinch the two tube portions of the wire guard together so they are touching, and slide the crimp up to meet them.

With your chain nose pliers, flatten the crimp so it makes secure contact to hold the wires. For the best appearance, there should be no space between the wire guard and the flattened crimp. Make sure you do not compress the tiny tubes of the wire guard as you flatten the crimp.


Step 2) String on beads:
Holding the two wires together, string one colored bracelet bead, then one metal rondelle, and then one 3mm round metal bead and slide them up to the crimp. Now split the wires and string one metal tube onto each one and slide them up to the 3mm round metal bead.

Hold the two wires together again and string on one 3mm round metal bead, one metal rondelle, one bracelet bead, and one heishi. Continue to alternate bracelet beads and heishi for a total of two, three, or four sets. Then add the focal bead, followed by enough bracelet beads and heishi to match the first side, ending with a bracelet bead.

You can adjust the size of your bracelet by the number of beads added in the center on either side of the focal bead.


String on a rondelle metal bead directly after the last bracelet bead, and then string on a metal 3mm round. Now split the wires again and string one metal tube onto each.

The bring the wires together again and string on one 3mm round bead, one rondelle, one colored bracelet bead, and finally, the second crimp.

Step 3) Add second wire guard and attach to clasp:
Make sure all beads are strung evenly and without spaces, showing bare wire as little as is possible. Separate the two wires coming out of the second crimp and feed one up through one side of the second wire guard, across the top of the wire guard, and down through the second side.

Now slip the second ring of your magnet clasp over the piece of beading wire that you just fed through the second side of the wire guard and bring it up into wire guard so it rests around the u-shaped channel. Once the magnet clasp is attached, bring the end of the beading wire back down through the crimp and the colored bracelet bead. Pinch the two tube portions of the wire guard together so they are touching.

Keeping the crimp in position against the last colored bracelet bead, pull the tail of the wire running through the wire guard until the gap is eliminated between the crimp and the wire guard.

You still have a second piece of beading wire going up through the crimp. Bring this second piece of beading wire back down through the crimp, forming a loop. Then, reduce the size of the loop by pulling on the short piece of the second wire until there is just a small "nub" at the top of the crimp.

With your chain nose pliers, flatten the crimp so it makes secure contact to hold the wires. For the best appearance, there should be no space between the wire guard and the flattened crimp. Make sure you do not compress the tiny tubes of the wire guard as you flatten the crimp.

Step 4) Trim wires:
Carefully trim off the two short pieces as close as you can, one to the bottom of the flattened crimp and the other to the colored bracelet bead. Your tube bracelet is now complete.

Visit Anita's Beads and ask to see a demonstration at the counter if you need help.

Tuesday, August 28, 2012

New Daily Bracelets


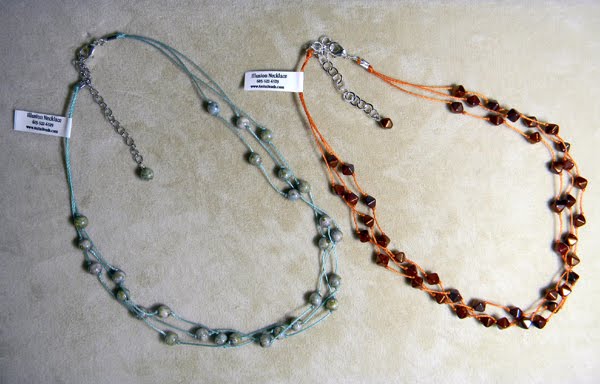
I've gotten back to wire work recently and am adding to the Daily Bracelet series using some of our new Czech pearls. I really love these orange ones for fall. Here is Daily Bracelet No. 47 with a matching necklace:


Here's another combination with some faceted Czech glass rondelles that remind me of blue Peruvian opal.
This is Daily Bracelet No. 46.


Friday, July 6, 2012

Czech Seed Beads


Anita's Beads stocks Czech seed beads in 6-strand hanks in the following sizes from large to small: 6/0, 8/0, 11/0, and size 13 Charlotte. The photo above shows our collection of opaque colors which are very popular for beading Native American designs.

Sunday, March 18, 2012

Kumihimo Jewelry by Harry


I had a special treat to share with last Thursday's Bead Club: some fabulous kumihimo braided necklaces made by Harry. Today he gave me permission to post photos of his work, and he is planning to attend the Bead Club meeting on Thursday March 29th from 7-9 pm so save the date!

Here's a close-up of the two-color necklace which is made of size 6/0 Czech seed beads on S-Lon cord.


I particularly like his designs with size 8/0 Japanese seed beads combined with Czech glass rosebuds. The glossy finish on the rosebuds provides a nice contrast with the matte finish of the seed beads. I can't wait to see the new designs he'll have to show us in two weeks.


Friday, March 9, 2012

New Coral Czech Beads for Spring!


We're getting stocked up for spring designs at Anita's Beads. Here's a selection of Coral Picasso (above) and Coral Shimmer beads (below). Shop early for the best selection.


Monday, February 20, 2012

My Favorite Czech Bead Wire-worked Bracelet


This bracelet was the precursor to my Daily Bracelet series. I sold it a few summers ago and have been trying, with no luck, to find a source for those Czech glass star flowers in the orange coral color!

Thursday, January 12, 2012

Kumihimo with Tex-400 Macrame Cord


Anita's Beads is now stocking Tex-400 macrame cord in 22 colors. It comes on spools like S-Lon, and it is about twice as thick. There are 35 yards to the spool as opposed to the 77 yards you get with S-Lon. It is available in fewer colors than S-Lon but the colors match the S-Lon line.


This is one of my favorite necklaces. (Some day I may even finish it!) It combines Czech glass beads (knotted with spaces in between like my Illusion Necklaces) on 8 strands of Tex-400 cord. I cut long strands so that after all the strands were knotted I could tie them together after the beads and braid both sides (one at a time) in my small kumihimo disc. I will end by gluing on 4mm barrel caps once I decide how long I want my finished necklace to be.

I made the second version (displayed at the top of the page) in green. This one combines 6 strands of Tex-400 cord with 2 strands of S-Lon. The 5mm round turquoise-green beads had holes too small for Tex-400. When I braided the ends, I mixed in some more of the 5mm beads on the S-Lon cord, leaving the Tex-400 strands plain.


The kumihimo braid on the far right of this last photo was done on Tex-400 with small Antique Copper beads on one strand only added every other turn.

Friday, August 5, 2011

August Illusion Necklace Classes


If you have been thinking about learning to make our cool Czech Glass Illusion Necklaces, you have two opportunities in August. Classes have been scheduled for Saturday August 6th and Saturday August 13th from 9-10 am. Bring a friend and save. The regular fee of $15. per person is reduced to $12. each for you and a friend. Call Anita at 603-522-6529 or send an email to make a reservation for either class.

Tuesday, July 19, 2011

More Illusions - Two Dates

If you missed last Saturday's Illusion Necklace class, here's your chance to take it on Saturday July 23rd or Saturday July 30th from 9-10 am. Bring a friend and save. The regular fee of $15. per person is reduced to $12. each for you and a friend. Call Anita at 603-522-6529 or send an email to make a reservation.


I have become totally addicted to making these necklaces now that I've discovered how fantastic they looked worn layered in multiples!


Visit Anita's Beads for a colorful variety of Czech Glass beads. Beads sized between 6mm and 8mm work well for the Illusion Necklace. We also stock 48 different colors of cord, in addition to finishing kits to complete your project. (Color Charts: Part 1 & Part 2. I will put up Part 3 in a future post.)

Wednesday, July 13, 2011

Illusion Necklace Class


Visit Anita's Beads on Saturday July 16th at 9 a.m. for the first in a series of Summer Classes. This session will be a drop-in class so there is no need to pre-register. The class will run for one hour, and the fee is $15. per person, all materials included. There will also be all necessary tools on hand for you to use.


We will be making 25-bead Czech glass Illusion Necklaces. In the class you will learn: knotting between beads, spacing knots evenly, application of fold-over ends, how to open and close jump rings, and the use of a head pin to create a dangle.


This same class will be scheduled on other days and times throughout the summer so watch this blog for further announcements.

Tuesday, September 14, 2010

Seven New Daily Bracelets


Seven new designs have been added to Anita's Daily Bracelet blog. Bead kits and finished bracelets are available at Anita's Beads.

New designs include an Apollo Gold rosebud design (detail above), a Czech "Stone" diamond bracelet, and two designs featuring our new synthetic stones: Azurite/Malachite and the incredibly popular Pink Rainbow Stone.

Thursday, July 1, 2010

New Camera & New Daily Bracelets


I just got a Nikon Coolpix digital camera with my credit card miles (happy birthday to me!) and I took some photos of a few new Daily Bracelet designs to test it out. All of the bracelets are available as kits at Anita's Beads.


Wednesday, April 14, 2010

Mixed Fruit a la Carmen Miranda


A lovely mix of bananas, grapes, apples, pears, strawberries and peach pits available by the 50-piece assortment.

Spring Special! (ends May 31st) - purchase three strands together as pictured and receive a 30% discount.

Friday, February 12, 2010

Bohemian Trade Beads


I absolutely adore the color and shape of these beautiful old glass cylinder beads known as Bohemian. We have two strands available. The first strand (outside) is an interesting mix of oranges with a few darker red beads. Strand length is 32 inches and the bead diameter is between 14mm to 18mm.


The second strand (inside, detail shown below) has larger (16mm to 20mm) predominantly red beads. The strand is 27 inches long.


Stop by Anita's Beads in Wakefield, New Hampshire to see more Trade Beads just received for Winter 2010. Shop hours are 10-5; closed Tuesdays and Wednesdays.

Tuesday, October 13, 2009

Czech Rainbow


We just received a new shipment of our favorite Czech matte glass beads in the ten colors shown above plus black. All are now available in strings of 20 beads.

Look for your favorite color in Anita's Daily Bracelets and Daily Bracelet kits offered at Anita's Beads.

Thursday, October 1, 2009

Baroque Bracelet


I'm four days ahead on my daily bracelet project at http://dailybracelet.blogspot.com. The latest design uses the matte crystal Czech glass baroque beads that I love so much along with siam ruby rosebuds for a holiday look. The metal is sterling silver throughout. I've been trying to get a decent picture off the scanner but there is too much traffic right now and the vibration is causing colored shadows. Interesting effect but I could do without it.

Wednesday, July 29, 2009

More New Czech Glass Beads

Here are more photos of new Czech glass beads. Above is a "Chiclet" style 13x17mm rectangle in three combinations reminiscent of stones: Malachite, Tiger Eye and Rhodonite.

I love this 8mm melon shape, shown above in Luster Opaque Green, Luster Rose/Gold Topaz, and Amethyst Marbled Gold.

Here's another color of the 8mm melon (above) called Chrysolite Celsian.

We've also added a smaller 5mm melon, shown above in Luster Opaque Green, Bronze Luster Iris Red, and Luster Rose/Gold Topaz.

Above are 9mm flat squares in Siam Ruby Vega, and Sunshine Dust.

And 3 more square flat beads, above: 9mm Luster Amethyst Matte, 6mm Luster Opaque Green, and 15mm Gold Matte with a cool Greek spiral design.

Here are two others with spirals sized 6mm: Coral with Gold and Jet Picasso with Brick along side a 4x6mm baby bell flower in Blue Raspberry Swirl.

These 6mm flower caps (above) make cute earrings and bracelet dangles. Colors are: Red Azuro, Metallic Rose Matte, Metallic Gold Matte, and Copper Iris.

We've also added these 7mm flower buds pictured above in Montana/Amber and Capri/Jonquil.

And two more colors (above) are Rose Opal and Jonquil/Amethyst. A fifth new flower bud is available in Hyacinth AB.

The 4x7mm nugget beads shown above come in Fuchsia/Crystal, White Opal, and Amber Crystal.

And finally, we now offer this lovely Turquoise Picasso faceted rondelle in 17mm and 11mm sizes.